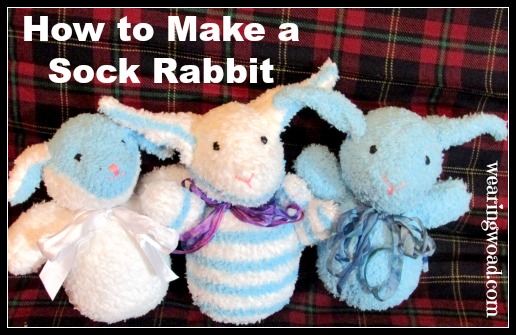
A little while back, I noticed a meme on Facebook saying that live Easter animals rarely survive. While a live pet is fun, it can also be expensive. And, for that matter, chocolate and other candy can end up being expensive, sticky, and messy. But, what if you could exploit the cuteness of a live rabbit, and side-step the expensiveness of a store-bought plushy, or a chocolate rabbit? 
Enter the Fuzzy Sock Rabbit.
This sock rabbit takes advantage of the softness of fuzzy socks, the natural shaping of the sock toe, and just a little bit of hand-sewing, to make a cute, cuddly, and epically adorable stuffed bunny. Pair this sock bunny with a sock lamb, using the other sock of the pair, and you can have a matching Easter set. Use different pairs of socks for more variety, or if you need multiple gifts.
Materials to Make One Fuzzy Sock Rabbit:
1 Fuzzy sock, if you are buying socks make sure they do not have the “anti-slip” grip spots on them.
Needle + Thread
Black and Pink embroidery thread for facial detailing
Fiber-fill stuffing
Making your Fuzzy Sock Rabbit:
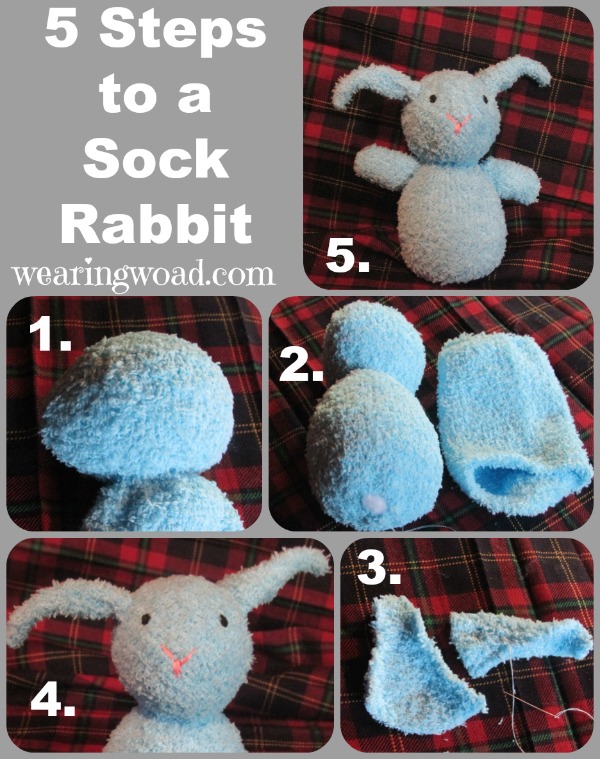
Step One: Grab your fuzzy sock, and your stuffing, and stuff a fair sized handful into the toe. Shape and nudge this into a bunny face.
Step Two: Run a line of gathering stitches around the bottom of your sock rabbit’s head. Pull tight, and secure. Add a bit of stuffing into the neck, if it has room, to make it feel more bulky.
Step Three: Stuff the foot of the sock to form the body. The body shape will end before the heel of your fuzzy sock. When the body is stuffed and shaped to your satisfaction, run another line of gathering stitches, pull tight, and fasten. Then, trim off the remaining sock and stitch closed the circular opening on the bottom of your rabbit.
Step Four: Your heel should have approximately a quarter inch of residual space on the trimmed side, when compared to the heel curve. Trim the sock to match on the other side, and cut all the way through the top of the sock.
Step Five: Open up your sock heel and cut in half at the widest point. The heel will form your rabbit’s ears. Do some trimming to make two ears out of the two halves of the heel. Fold the heel halves in half, and stitch the raw edge together. Turn right side out.
Step Six: Sew your sock rabbit’s ears to its head. Adjust your positioning so that it makes the narrowest point of the sock-toe into the rabbit’s nose.
Step Seven: Embroider on your rabbit’s nose and eyes. Use satin stitch for the eyes, and either satin stitch, or plain stitches, for the mount/nose delineation.
Step Eight: Take the leg of your sock, and cut out two arms. I like cutting a strip of an inch wide from one folded side. Then, cut that in half. Fold each half right-sides together and stitch on two of the open sides. Turn right side out and stuff. Stitch the arm closed and secure to your sock rabbit’s shoulder.
Step Nine: Add a ribbon bow, if desired, and admire your cute sock rabbit.
Since this little bunny only uses one sock, and a pile of fiber-fill, the cost is actually less than 1$ per rabbit. You can make two rabbits from a pair, or use this lamb pattern to make two different critters from the same pair of fuzzy socks.
You can’t make just one!
Variations:
Depending on how you fasten your ears, you can make a perky eared, or a droopy eared rabbit.
Using your left-over sock material, you can cut out a heart, or other shape, and turn it into a little pillow. Sew the pillow securely onto your rabbit for a cute touch. You could make an egg pillow for Easter, or a heart pillow for Valentines.
Also, depending on your sock’s pattern, you can make rabbits that are suitable for different occasions. Pastel colors for Easter, or for baby gifts, brighter colors for other holidays or for birthday and special occasion gifts.
Back To You:
If you enjoyed this little bunny rabbit making tutorial, leave a comment and let me know. I enjoy hearing from you, and would love to know how your versions of this bunny turned out.